Overview
In Revit, there is no easy way to schedule all locations of a detail group. Use this method to quickly locate all instances of a detail group and where they are placed throughout the file (in what view/sheet) All without using Dynamo.

Steps:
- Scroll down in your Project Browser window, and find the Groups section, and the Detail subgroup.
- Right click on the detail group, and select all instances in the file.
- Click Group (GP) at the top to attempt to group all these detail groups.
- An error will get kicked back stating that it cannot group these groups across multiple views.
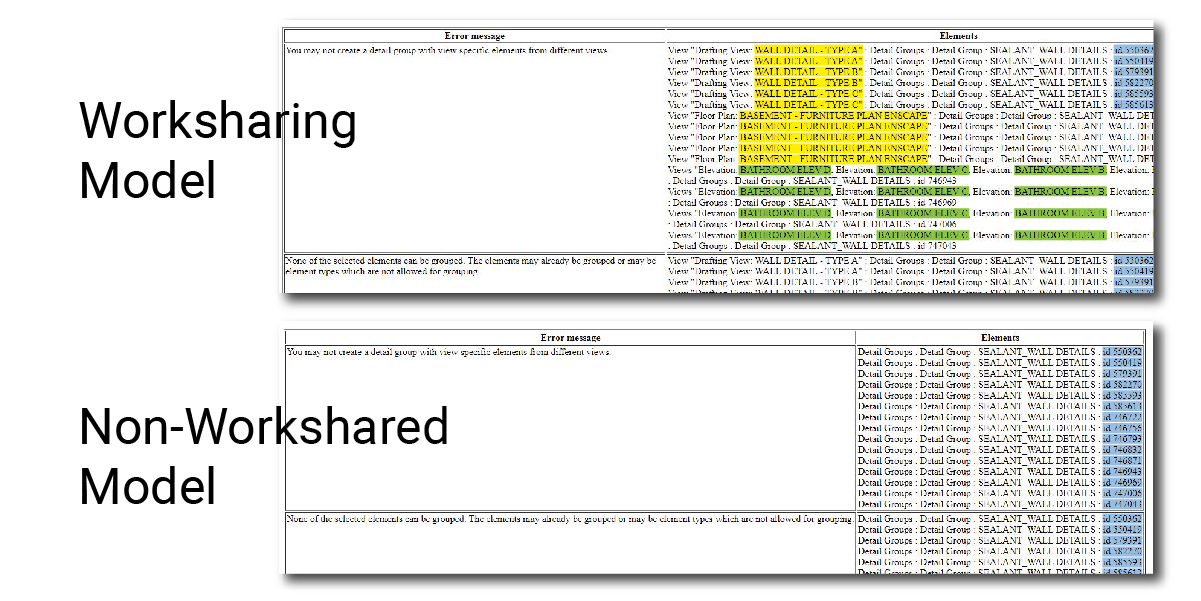
- Error Text: “You may not create a detail group with view specific elements from different views.”
- If you do not get an error, see the “No Error” Section below.
- Click [Expand] then [Export] to export a full list in an .html file
Output
Depending on a couple variables, you’ll get some different outputs. Both of these will generate an HTML file you can open.
Worksharing
When doing this via a worksharing file, it will output the view name (yellow) to go interrogate. Note that it also includes the exact model element ID (blue)
Multi-Elevation views
Note in Green it shows you 4 elevation views for one detail group ID. The object is only located in one of these 4 views. This happens when you have an elevation with multiple views associated to it (see image).
You can either interrogate each view, or follow the method below for non-worksharing to find the detail group.
Non-Workshared Models
For non-workshared models, it will output a list of all the element IDs. You can then use this to Select by ID in revit and click “show” to see the location of the detail group.
Temporarily enable worksharing
Another option is to save a copy of your file, enable worksharing on that file, then generate the report. This will create a worksharing output. (then delete that temp file).
No Error?
This will happen for 2 reasons. Both are solved the same way.
1 Instance
The detail group is only located in one location (in one view). This means that it CAN group it because its not trying to group across multiple views.
All instances in one view
You may have 5 instances of a group, but if they are all located within the same view, as before, it CAN group it because its not trying to group across multiple views.
Solution
In both cases, the solution is to place a temporary instance of the detail group in a different view. This will cause the program to try and group across multiple views, which will kick up the error window.